Dostava besplatna Vodene pumpe EWP80 Alloy Flange Kit - Remote Electric Water Pump (12V) | race-shop.hr Prikaži uvećano

*413 898   

Davies Craig

EWP80 Alloy Flange Kit - Remote Electric Water Pump (12V)

The EWP®80 Alloy Flange is available for purchase in following options:. Key specs: 90 L/min (23.8 US gal/min) @ 0 kPa flow rate; 7.5A @ 13V max current.

Novi proizvod

Po narudžbi : 10+kom

U vašem domu najkasnije: 2. 10.

220,90 € s PDV-om

8006   

9311669080069

Upit o proizvodu

Upit o proizvodu

EWP80 Alloy Flange Kit - Remote Electric Water Pump (12V)

EWP80 Alloy Flange Kit - Remote Electric Water Pump (12V)

The EWP®80 Alloy Flange is available for purchase in following options:. Key specs: 90 L/min (23.8 US gal/min) @ 0 kPa flow rate; 7.5A @ 13V max current.

Pošaljite pitanje ovoj trgovini.

* Obavezna polja

  ili  Otkaži

Obavjestiti kad bude na lageru

EWP80 Alloy Flange Kit - Remote Electric Water Pump (12V)

EWP80 Alloy Flange Kit - Remote Electric Water Pump (12V)

Ako želite biti obaviješteni o dostupnosti proizvoda putem emaila, ispunite obrazac.

* obavezni podaci

  ili  Otkazati

The EWP®80 Alloy Flange is available for purchase in following options:. Key specs: 90 L/min (23.8 US gal/min) @ 0 kPa flow rate; 7.5A @ 13V max current.

The EWP80 Alloy Flange is available for purchase in following options:

  • Pump Only (Part DC8106)
  • Kit (Part DC8006)
  • Combo with Controller (Part DC8908)

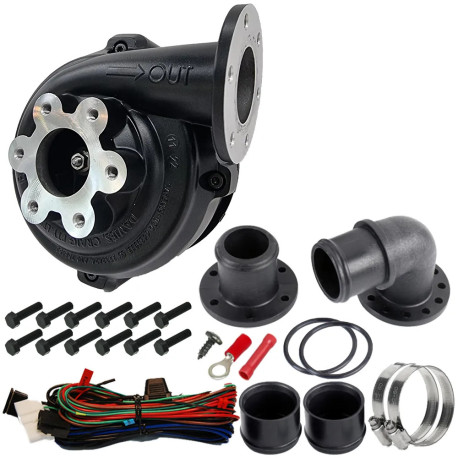
The EWP80 Alloy Flange Kit configuration mirrors the highly successful EWP80 Nylon pump. It provides a maximum flow rate of 90 l/min and will fit most vehicle engines up to two litres as an alternative to the mechanical belt-driven pump or as an auxiliary pump.

This compact pump is manufactured out of lightweight Aluminium and utilises 6 bolt flange fittings for superior fitment flexibility. Arriving in a magnificent matt-black powder-coated finish, it removes parasitic power losses, providing up to 10kW (13hp) of extra power and increased torque. Used extensively in Intercooler applications.

Contents

  • EWP® 80 - Alloy Flange: 1
  • 5x12 Flanged Hex Set Screw Zinc Silver: 12
  • 35mm Nylon Flange Adapter 90 degree Elbow: 1
  • 35mm Nylon Flange Adapter Straight: 1
  • EWP Adapter O-Ring: 2
  • Adapter Rubber Sleeve 3mm (1/8"): 2
  • Hose Clamps: 2
  • EWP Basic Wiring Loom: 1
  • Wire Joiner / 6mm Ring Terminal / Self Tap Screw: 1 ea
  • Relay 12V 40 Amps: 1
  • Installation Instructions: 1

Technical specifications

  • Operating voltage: 12V DC (16V Max)
  • Max Current: 7.5A @ 13V
  • Flow rate (max): 90 L/min (23.8 US gal/min)
  • Maximum Head Height: 5.2m (17ft 0.72in)
  • Operating / Fluid temp.: -40° to 120°C (-40° to 248°F)
  • Pump design: Clockwise centrifugal with volute chamber
  • Pump weight: 1100 grams (2.43 lb)
  • Motor Type: Brushed DC Motor
  • Body Material: Aluminium (Matt Black Powder Coated)
  • Burst pressure: 500 kPa (72.52 Psi)
  • Inlet & Outlet: 6 Bolt Flange / 35mm Push on barb
  • Hose Fitment: 32mm to 38mm (1¼” to 1½”)

EWP & controller installation demonstration

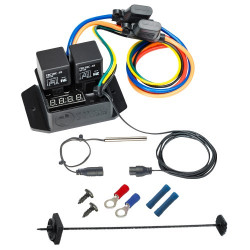
Combined with an LCD EWP/Fan Digital Controller (Sold separately Part DC8002 or EWP Combo Pack) will manage both the EWP and Thermatic fan operation. The Digital Controller will vary the speed of the EWP in response to the engine’s coolant temperature.

Key benefits

  • universal fit
  • more power
  • more cooling
  • increase fuel efficiency
  • extend engine life
  • world-leading technology

EWP® installation options

Installing an EWP® as an AUXILIARY PUMP

  • Leaving the mechanical water pump in place, install the EWP into the bottom radiator hose.
  • Remove the thermostat and drill two approx. 3mm (1/8") holes in the thermostat plate to allow some coolant circulation when the thermostat is closed. Re-install ensuring that the thermostat housing is clean and a new gasket is used if required.

EWP® INSTALLATION – disabling Mechanical water pump

  • Leaving the mechanical water pump in place, install the EWP into the bottom radiator hose and remove the manufacturer’s thermostat.
  • You will need to bypass the water pump pulley by installing an appropriate length belt (not supplied). This method makes for an easy installation.
  • If running the pump continuously remove the thermostat and drill two approx. 3mm (1/8") holes in the thermostat plate to allow some coolant circulation. Re-install ensuring that the thermostat housing is clean and a new gasket is used if required.

In both these cases, the EWP will pump past the impeller of the mechanical water pump.

Disengaged mechanical water pump (recommended)

  • Remove the mechanical water pump and remove the thermostat.
  • Then remove the impeller from the mechanical pump shaft. Retain the mechanical water pump using the pump pulley as an idler to avoid re-routing the drive belt.
  • Block any bypass passages and re-install the disengaged water pump ensuring that all gasket surfaces are clean and the new gaskets are properly fitted to prevent leaks.
  • Install the EWP into the bottom radiator hose.

Removed mechanical water pump (Ideal)

  • Remove the mechanical water pump and thermostat from the engine.
  • Install a Davies Craig EWP Header Adaptor or blanking plate (not supplied). Ensuring the gasket surfaces are clean and the appropriate gasket or sealant is used to prevent leaks.
  • Install the EWP into the bottom radiator hose. This method will require you to modify or replace the standard radiator hose.
  • Install an appropriate length belt (not supplied) to drive the accessories.

In most cases EWP® will be adequately supported by the radiator hose. Where mounting is required, the EWP® must be soft mounted to protect against vibration. For the EWP® 115, EWP® 140 and EWP® 150 Part DC8700 or DC8710 Mounting bracket is recommended.


Ostavi komentar

Ostavi komentar


  ili  Poništi

Nema odgovora?
Postavite pitanje
Imate pitanje? Pronađite odgovor u raspravi.


MarkaModelGodina
Mazda626 & MX6CB2 | 1978-1983
Mazda929 & 929LLA4MS Sedan | 1977-1981
Nissan16001600 (P510) | 1967-1968
Nissan16001600 (P510) | 1968-1972
Nissan180B180B (P610-KP610) | 1972-1977
ToyotaCelicaRA21, TA20 & TA22 | 1971-1975
ToyotaCelicaSA63 & RA65 | 1983-1985
ToyotaCelicaTA23,RA23 & RA28 | 1975-1977
ToyotaCorolla70 Series, Sedan, AE70, KE70 & KE71 | 1979-1985
ToyotaCorolla70 Series, T18, TE70,TE71 & TE72 | 1979-1985
ToyotaCorolla80 Series, Sprinter AE86 | 1983-1989
ToyotaCorolla90 Series, AE95 4wd | 1987-1995
ToyotaCoronaRT104 & RT118 | 1974-1978
ToyotaStout & Lite StoutRK110 | 1979-1983
ToyotaT18TE71 & TE72 | 1979-1983
ToyotaTercelAL series, AL25 4WD Wagon | 1983-1988

Recent posts

Garrett Powermax za 1.9 TDI motore

Plug & Play rješenje za povećane performanse
Read more
Hladnjaci Races Motorsport

Nova evolucija Races intercoolera.
Read more
Sportski ovjes

Put do boljih voznih karakteristika: Kako odabrati pravi ovjes?
Read more
Garrett Powermax Fiat 500 Abarth

Powermax donosi više snage maloj raketi Fiata 500 Abarth.
Read more
Garrett Motion

Garrett Motion je globalni tehnološki lider u turbopunjenju, donoseći tehnologije razvijene u Formuli 1 jednosjedima ili klasičnim serijskim vozilima. 
Read more
Kacige BELL

Kako odabrati pravu kacigu od BELL Racing?
Read more
Legalna modifikacija automobila? Kako to učiniti?

Kako poboljšati svoj automobil, a ne izgubiti tehničku dozvolu?
Read more
Kako ugraditi sportsko sjedalo?

Jednostavne upute o tome kako opremiti unutrašnjost sportskim sjedalom.
Read more
Kako ispravno odabrati aluminijske felge za svoj automobil?

Informacije i važni pojmovi koje bi svaki automobilski entuzijast trebao znati za pravi odabir kotača. 
Read more

Kategorije Proizvođači

Loading...